Introduction
The Northwind and Pubs sample databases
are staples of other sample code on this and other development
websites. They are used in countless tutorials and walkthroughs
published by Microsoft and others. Being a SQL/SQL Server newbie myself, I figured there may be others in my boat who might want both databases in an easily-accessible spot, and an easier, less error-prone way of installing them into SQL Server 2008 Express Edition than, say, running SQL query scripts.
There have been requests for an update to my SQL Server 2005 article for SQL Server 2008; so, by popular demand, here is the update! This article is based on an installation of Microsoft SQL Server 2008 Express Edition with Tools, Service Pack 1, on a machine with Microsoft Windows Vista Business, Service Pack 1, installed.
I was not 100% sure at first whether to write this new article -- because the user-interface in SQL Server Express 2008
Management Studio is virtually identical to that of the 2005 edition --
but decided to anyway, just so to distinguish between the two versions
and to assist users who come up with errors or issues which may possibly
be unique to the 2008 version; these errors can be posted and discussed here, separate from the 2005 version's.
Background
It's lost on me why one must use *.sql query scripts to install these samples. It's also lost on me why SQL Server distributions don't come with these databases
provided, since they are used so ubiquitously through documentation,
websites, and tutorials. There are probably several good reasons for
this. However, I am focused on usability, and not on making things
harder than they have to be.
There undoubtedly will be readers who will protest and say that I should use *.sql
query files whenever possible; this is good and a perfectly acceptable
practice. For example, if you have complex queries or you need to attach
several databases in a batch, then *.sql query files can be very useful. I see this article as illustrating just another way to accomplish a similar objective.
It's worth noting, for example, that a default Visual Studio .NET 2008 Professional Edition installation does not distribute these databases. Unlike the previous version of Visual Studio .NET, it does not even go part-way by installing the required SQL
Scripts --- at least, I have not been able to locate them with the
latest version. The download attached to this article contains the
latest version of the Northwind and Pubs database files as distributed by Microsoft on MSDN.
Personally, I favor using graphical (GUI) tools and methods over
typing cryptic commands and deciphering error messages. So, this article
illustrates how to install the Northwind and Pubs databases using graphical tools and methods.
Steps: Installing the Northwind and Pubs Databases
Note: The steps above make use of SQL Server Management Studio Express, which sometimes doesn't install along with a Microsoft SQL Server 2008 Express Edition install. For this case, you need to install SQL Server 2008 Express with Tools from this website.
Step 1: Using the download link
above, download the Zip file containing the following files. Extract
the files to a directory on your computer and remember where you put
them. For these steps to work, you must have the following files on your
computer:
- NORTHWND.MDF
- NORTHWND.LDF
- PUBS.LDF
- PUBS.MDF
Note: Make sure that you have read-write access to
these files, and that they are in an easily-accessible directory. For
ease-of-use, I suggest using C:\Program Files\Microsoft SQL Server\MSSQL.1\MSSQL\Data, or its analogy on your system, which is where Microsoft SQL Server 2008 prefers to store flat database files.
Step 2: On the Start menu, click All Programs, open the Microsoft SQL Server 2008 folder, and then click SQL Server Management Studio.
SQL Server Management Studio starts and displays the Connect to Server window, shown in Figure 1.
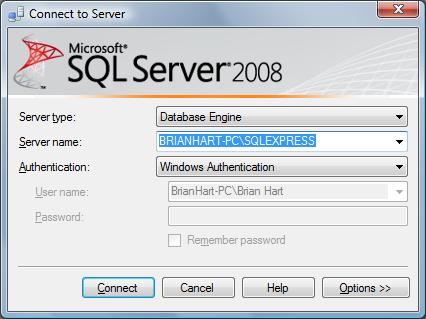
Figure 1. The Connect to Server window
Fill in the appropriate settings on the Connect to Server window that appears, and then click Connect.
SQL Server Management Studio Express opens the Object Explorer with the server's databases displayed.
Step 3: Right-click the Databases folder and then click Attach, as shown in Figure 2.
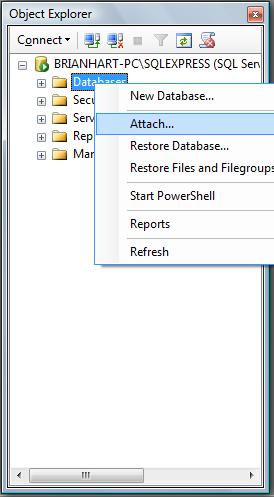
Figure 2. The Object Explorer window
Step 4: In the Attach Databases window, click Add....
The system prompts you for the proper *.mdf file using the Locate Database File window, as shown below in Figure 3.
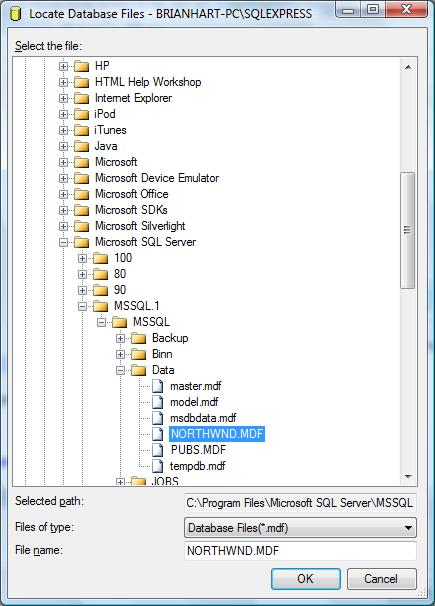
Figure 3. The Locate Database File window
Step 5: Locate and click on the NORTHWND.MDF file, and then click OK.
The right pane of the Attach Databases window will look as shown in Figure 4.
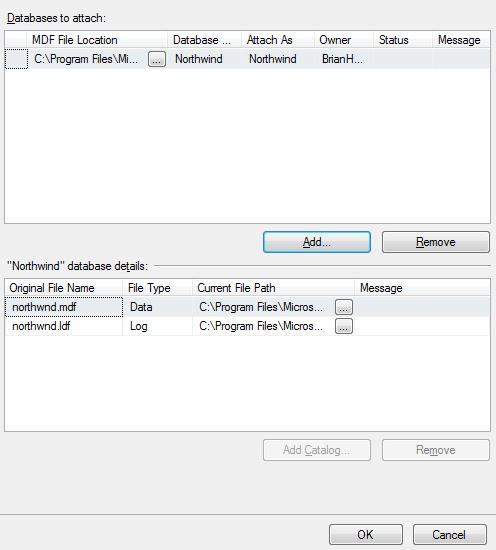
Figure 4. The right pane of the Attach Databases window after adding the Northwind database
Step 6: Repeat steps 4 and 5 for the PUBS.MDF file.
When you're done, and if you did the proper actions, the right pane of the Attach Databases window should look as displayed in Figure 5.
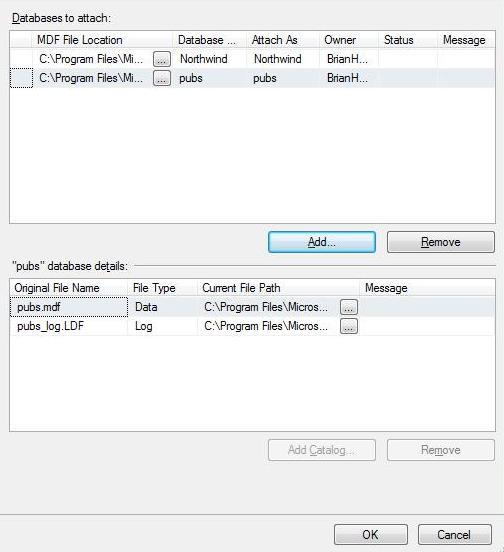
Figure 5. The right pane of the Attach Databases window after adding the Pubs database
Step 7: In the Attach Databases window, click OK. The window displays the progress of the operation and whether it has completed successfully.
Step 8: To check that everything was successful, in the Object Explorer window, click the plus sign to open the Databases folder.
The Northwind and Pubs databases will be displayed, as shown in Figure 6.
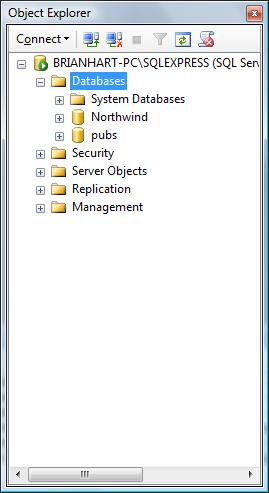
Figure 6. The Object Explorer after importing the Northwind and Pubs databases
|